

Looking for a fun and deliciously cheesy snack that combines the satisfying flavors of tacos with the convenience of finger foods? Look no further than Cheesy Taco Sticks! This easy-to-follow taco stick recipe brings together the comforting taste of Tex-Mex flavors in a crispy, cheese-filled snack that’s perfect as a party food idea or a quick lunch recipe. Let’s dive into the detailed steps to create these tantalizing snacks.
Ingredients
Prepare for these delicious cheesy snacks with the following ingredients:
- Ground Beef Filling:
- 1 pound ground beef
- 1 small onion, finely chopped
- 2 cloves garlic, minced
- 1 tablespoon taco seasoning
- 1/2 cup water
- Cheesy Sticks:
- 1 cup shredded mozzarella cheese
- 1 cup shredded cheddar cheese
- 8 flour tortillas
- Topping:
- 1/4 cup melted butter
- 1 teaspoon garlic powder
- 1/2 teaspoon smoked paprika
Note: Use high-quality ground beef with moderate fat content for a juicy, flavorful filling. Tortillas should be soft and pliable for easy rolling. Opt for organic cheeses if possible for a fresh taste. Experiment with different cheese combinations, such as pepper jack for a spicy kick. Freshly grated cheese melts better than pre-shredded for a smoother texture. Check out our related guide for more tips.
Steps / Instructions
- Preheat your oven to 400°F (200°C). Ensure the oven is fully preheated to guarantee even cooking. The preheating process should take about 10-15 minutes, depending on your oven.
- Prepare the Ground Beef Filling:
- In a skillet over medium heat, brown the ground beef. Break it apart with a spatula until fully cooked and no longer pink. Cook for about 8-10 minutes, ensuring the beef is broken into small pieces for even flavor distribution.
- Add chopped onion and minced garlic to the skillet; sauté until the onion is translucent. This typically takes about 3-5 minutes. Stir consistently to avoid burning the garlic.
- Stir in the taco seasoning and water. Simmer for 5-7 minutes, allowing the flavors to meld and the mixture to thicken. Stir occasionally and reduce heat if needed to prevent sticking. The mixture should be slightly saucy but not watery.
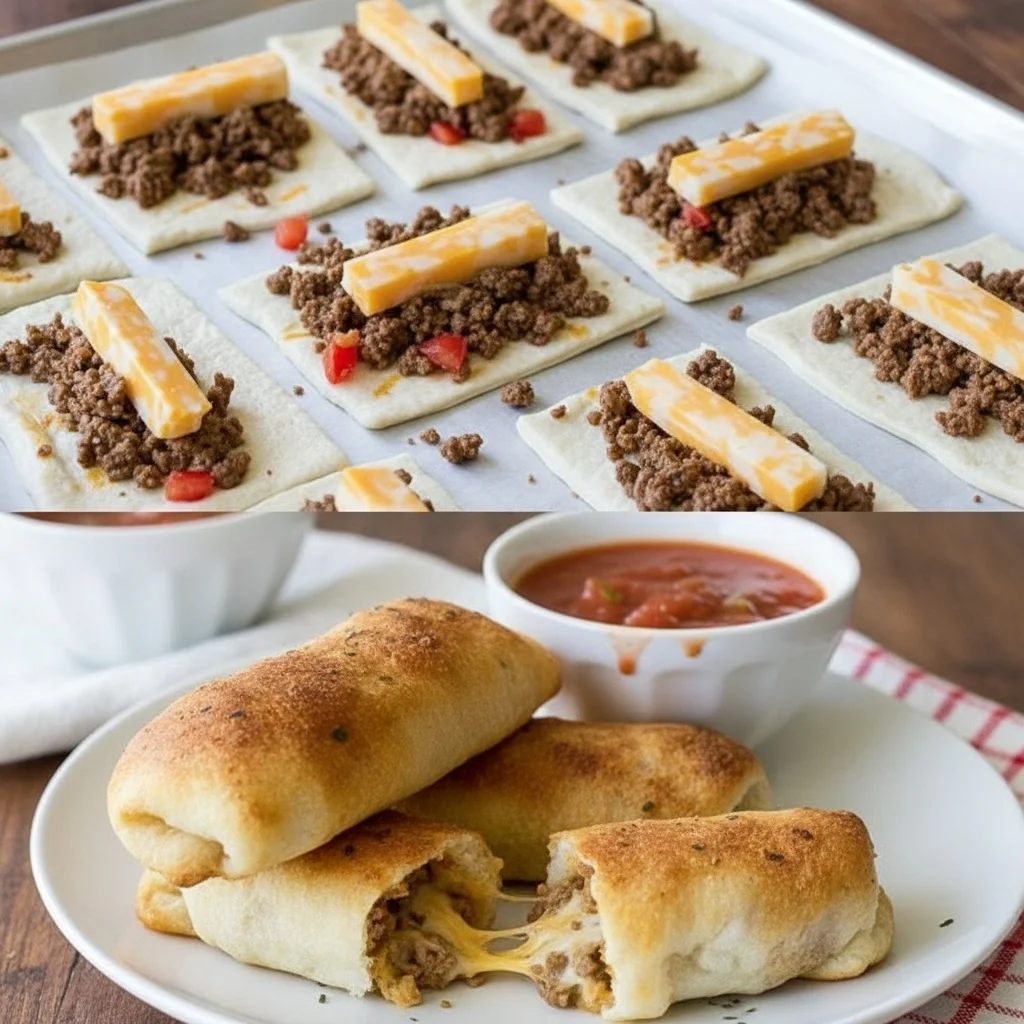
- Assemble the Cheesy Taco Sticks:
- Lay a tortilla flat and spread a generous spoonful of the beef mixture along the center. A heaping tablespoon usually works best, ensuring even coverage. Avoid overfilling to prevent tearing.
- Sprinkle a mix of mozzarella and cheddar cheeses over the beef filling. Aim for about two tablespoons of cheese to ensure a gooey, cheesy center. You can adjust the cheese quantity based on your preference for cheesiness.
- Fold in the sides of the tortilla, then roll it tightly into a log. Repeat with remaining tortillas. Keeping the rolls tight will help them stay together during baking. Use a gentle yet firm hand for the best results.
- Bake the Taco Sticks:
- Arrange the rolled tortillas on a baking sheet lined with parchment paper. This prevents sticking and ensures easy cleanup. Space them evenly to allow for even cooking.
- Mix melted butter with garlic powder and smoked paprika. Brush this mixture over each tortilla. Be generous with the butter mix to enhance flavor and to aid in crisping the tortillas. This step adds a delightful buttery crust.
- Bake in the preheated oven for 10-12 minutes, or until the tortillas are golden brown and crispy. Watch closely, as oven temperatures may vary. The edges should be crisp and the cheese should be melted and bubbly.
- Remove from the oven and let cool slightly before serving for the best texture. Cooling for about 5 minutes prevents burns and helps the sticks hold together better. This brief resting period also allows flavors to set.
Tips & Tricks
Consider these tips for achieving perfect Cheesy Taco Sticks:
- Storage: Leftovers can be stored in an airtight container in the refrigerator for up to three days. Reheat in the oven to retain crispiness. If you’re in a hurry, use a microwave but expect a softer texture. For longer storage, freeze the baked sticks and reheat directly from frozen.
- Make-Ahead: Pre-assemble the taco sticks and refrigerate them until ready to bake. This makes them a convenient easy taco appetizer for any gathering. To freeze, wrap unbaked sticks individually in aluminum foil. When ready to bake, simply extend the cooking time by a few minutes.
- Mistakes to Avoid: Overfilling the tortillas can make them difficult to roll and prone to breaking. Use just enough filling to comfortably roll each stick. Avoid using low-moisture cheeses that might not melt well. If the cheese isn’t melting adequately, try covering the baking tray with foil for part of the baking time.
- Pro Technique: For an extra kick, add a layer of nacho cheese sauce over the beef before adding shredded cheese. Consider sprinkling chopped fresh cilantro over the finished product for a burst of flavor. A squeeze of lime juice over the finished sticks enhances their freshness.
- Rolling Tips: For consistent sizing, use a small kitchen scale to weigh each portion of beef filling. This ensures uniformity for better presentation and cooking results. Practice makes perfect; don’t be discouraged if your early rolls are imperfect.
Variations
Tailor your Cheesy Taco Sticks with these creative twists:
- Vegan Version: Replace ground beef with crumbled tofu or lentils, and use vegan cheeses. Try adding nutritional yeast for a cheesy flavor boost. It’s a perfect way to adapt the recipe for plant-based diets without sacrificing taste.
- Gluten-Free Option: Opt for gluten-free tortillas for those with dietary restrictions. Ensure the taco seasoning used is also gluten-free. Some corn tortillas can also work well if you prefer a different texture.
- Flavor Boost: Add jalapeños or hot sauce to the beef for a spicy taco filling. Alternatively, sprinkle in a dash of cayenne pepper before baking. This will cater to those who love their snacks with a bit of heat.
- Ingredient Swaps: Substitute mozzarella with pepper jack cheese for a spicier profile. For a smoky touch, consider adding a few drops of liquid smoke to the beef mixture. This small change can make a big difference in flavor complexity.
- Herb Infusion: Infuse the melted butter topping with fresh herbs like oregano or thyme for an earthy flavor that complements the spicy filling. Basil or parsley can also add a fresh herbal note.
Serving Suggestions
Enhance your meal with these serving suggestions:
- Pair with Mexican Street Corn Salad for a refreshing side. The creamy texture complements the crispy taco sticks perfectly. This salad’s zingy flavors make a delightful contrast.
- Offer a dip of sour cream, guacamole, or salsa for added zing. A homemade avocado lime crema can add a gourmet touch. These dips can also add moisture and richness to each bite.
- Complement with a chilled Mexican beer or a tangy lime soda. For a non-alcoholic option, try a sparkling water with a splash of lime juice. These beverages help cleanse the palate between bites.
- Serve with a side of cilantro lime rice to add a fluffy texture that balances the crispiness of the taco sticks. The subtle citrus notes in the rice pair well with the taco flavors.
FAQ
- Can I use corn tortillas instead? Yes, but they may not roll as easily and might need to be pre-warmed to avoid breaking. Heating them on a skillet briefly can help improve flexibility. This method softens the tortillas, reducing the chance of tearing.
- What if my tortillas crack? Slightly warming them in the microwave can make them more pliable. Cover with a damp paper towel while microwaving. This prevents them from drying out and becoming brittle.
- Is it possible to make these spicy? Absolutely! Incorporating diced green chilies or a drizzle of hot sauce into the filling will amp up the heat. Try using hot pepper cheese for an extra punch. Adjust the spice level according to your taste preference.
- How do I prevent soggy sticks? Ensure the beef mixture is not too wet and bake on a wire rack for even crisping. Let them cool on a wire rack to maintain crispiness. The air circulation helps retain their crunch.
- Can I prepare these ahead of time? Yes, you can assemble them a day in advance and store in the fridge, making them perfect for meal prep or parties. Just follow the baking steps when ready to serve. This advance preparation saves time on the day of serving.
Cheesy Taco Sticks
A fun and deliciously cheesy snack that combines the satisfying flavors of tacos with the convenience of finger foods. Perfect as a party food idea or a quick lunch recipe.
Ingredients
- 1 pound ground beef
- 1 small onion, finely chopped
- 2 cloves garlic, minced
- 1 tablespoon taco seasoning
- 1/2 cup water
- 1 cup shredded mozzarella cheese
- 1 cup shredded cheddar cheese
- 8 flour tortillas
- 1/4 cup melted butter
- 1 teaspoon garlic powder
- 1/2 teaspoon smoked paprika
Directions
Preheat your oven to 400°F (200°C).
In a skillet over medium heat, brown the ground beef for about 8-10 minutes until fully cooked.
Add chopped onion and minced garlic; sauté until the onion is translucent, about 3-5 minutes.
Stir in the taco seasoning and water. Simmer for 5-7 minutes until thickened.
Lay a tortilla flat, spread a spoonful of beef mixture along the center, and sprinkle cheeses over the beef.
Fold in sides of the tortilla, then roll into a log. Repeat with remaining tortillas.
Arrange rolled tortillas on a baking sheet lined with parchment paper.
Mix melted butter with garlic powder and smoked paprika. Brush over tortillas.
Bake in the preheated oven for 10-12 minutes until golden brown and crispy.
Remove from the oven and let cool slightly before serving.
Recipe Reviews
- ★★★★★
Excellent recipe!
Leave a Reply
Your email address will not be published. Required fields are marked *


Excellent recipe!