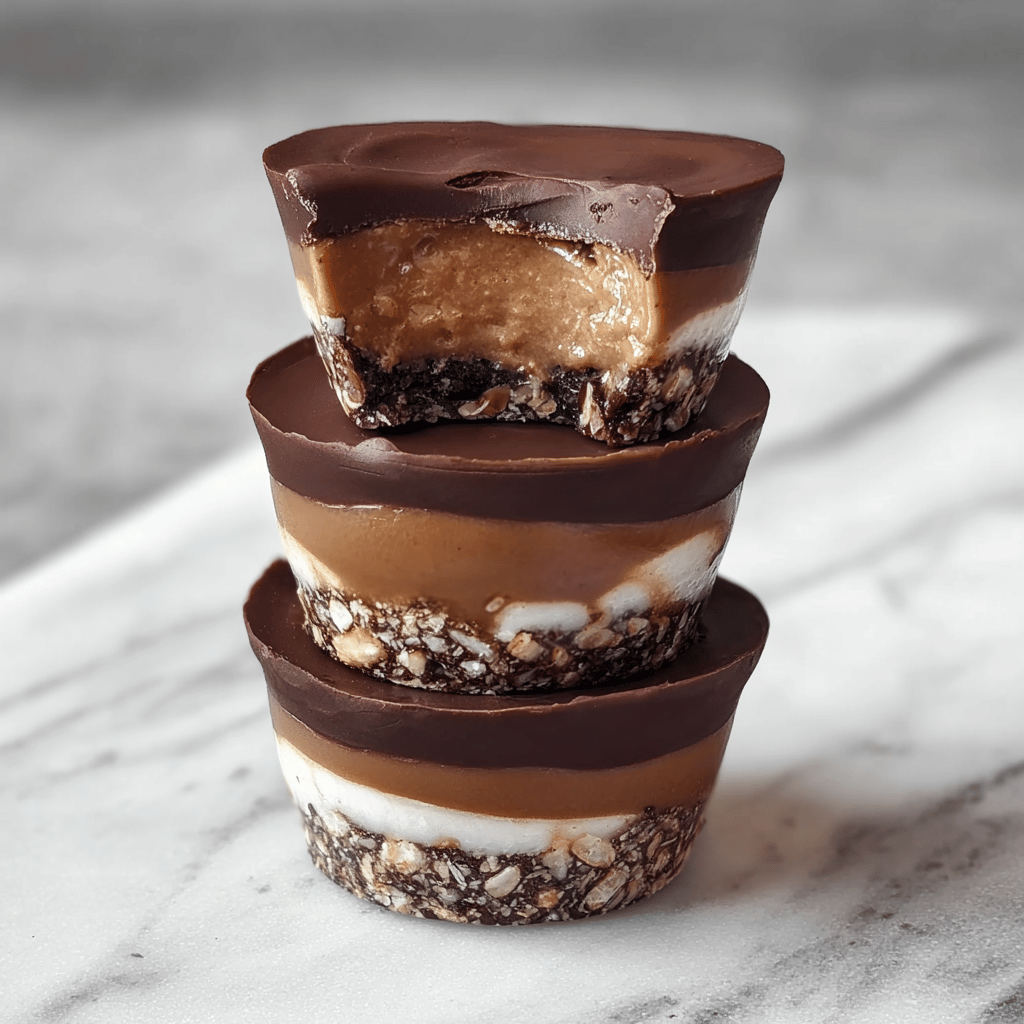
The first time I attempted to make these no-bake peanut butter oat cups, let’s just say, the kitchen looked like a war zone. Oatmeal everywhere, sticky peanut butter dollops on the counter… and the cups? Well, they were less ‘cup’ and more ‘sad, crumbly heap’. But my mom always said, “If at first you don’t succeed, try, try again.” And I did. Now, these delightful little treats have become a family favorite—quick, satisfying, and oh-so-tasty. (learned this the hard way) They’re perfect for those moments when the craving hits but the thought of firing up the oven is a definite no-go.
Now, about those ingredients… I’m not talking about a trip to some fancy health food store to find them. Nope. Everything you need for these peanut butter oat cups is probably sitting in your kitchen right this second. And the best part? It’s a no-judgment zone here, so whether you’re using the last scoop of your budget-friendly peanut butter or the fancy organic kind that requires a good stir before use, you’re on the right track.
Table of Contents
Ingredients
Alright, let’s get down to business. Here’s what you’ll need:
- 1 cup natural peanut butter (chunky or smooth, your call)
- 2 cups old-fashioned oats (none of that instant stuff)
- 1/2 cup honey or maple syrup (for my vegan friends)
- 1 teaspoon vanilla extract
- 1/2 cup dark chocolate chips (or more, I won’t tell)
- A pinch of sea salt (because a little contrast never hurt)
Instructions
Okay, don’t panic. It’s seriously easy. Just follow these steps and you’ll be golden.
- In a medium bowl, mix the peanut butter, honey (or maple syrup), and vanilla extract until well combined.
- Stir in the oats and mix until they’re all lovingly coated with the peanut butter mixture.
- Line a muffin tin with cupcake liners (because who has time for scrubbing pans, am I right?), and evenly divide the mixture among them, pressing down to form the cups.
- Melt the chocolate chips in the microwave or using a double boiler (if you’re feeling fancy), then spoon a dollop on top of each oat cup.
- Sprinkle that pinch of sea salt on the chocolate, because trust me, it’s a game changer.
- Pop the muffin tin in the fridge for at least an hour to set. (If you can wait that long—sometimes I can’t.)
- Once they’re firm, peel them out of the liners and indulge!
Tips & Tricks
Okay, here are some insider tips to turn you into a no-bake pro:
- If your peanut butter is a little on the dry side, add a touch more honey or maple syrup to keep the mixture pliable. (I’ve definitely overestimated my peanut butter’s moisture content before.)
- Feeling adventurous? Mix in some chopped nuts or dried fruit for extra texture and flavor.
- Storage is key: keep these babies in an airtight container in the fridge, and they’ll last up to a week. (Though they’ve never lasted more than two days in my house.)
FAQ
Got questions? I’ve got answers:
Q: Can I use quick oats instead of old-fashioned?
A: You can, but the texture might be less chewy. Old-fashioned oats hold their shape better and give you that hearty bite.
Q: How many calories are in each cup?
A: It depends on the size of your cups and the exact ingredients, but on average, about 200-250 calories each. Remember, they’re treats!
Q: Any ideas for substitutions if I’m allergic to peanut butter?
A: Absolutely! Try almond butter, sunflower seed butter, or any nut or seed butter you like. Just keep the consistency similar to peanut butter.
And now, let’s talk about the cultural story behind these no-fuss cups. My neighbor, who comes from a long line of no-bake dessert masters, shared her family’s version of this recipe with me. She told tales of hot Southern summers where the mere thought of turning on the oven could make you break out in a sweat. These peanut butter oat cups were her grandmother’s clever way to satisfy a sweet tooth without adding to the heat. It’s amazing how necessity breeds the most delicious inventions, isn’t it?

In conclusion, these Easy No Bake Peanut Butter Oat Cups are more than just a quick treat. They carry with them a legacy of innovation, the spirit of Southern kitchens, and the love from my own family’s heart. Whether you’re making these for a simple snack, a potluck, or just because you need a little pick-me-up, they’re sure to bring a smile to your face. And honestly, isn’t that what cooking is all about? Sharing the love, one oat cup at a time.
Troubleshooting
Alright, so you’ve followed the steps but things didn’t turn out quite right? Don’t worry, it happens to the best of us. Here are a few common pitfalls and how to dodge them:
- If your cups are too crumbly, it might mean your peanut butter wasn’t runny enough. Next time, try heating it up a bit before mixing it in.
- Too sticky? Your ratio of wet to dry ingredients could be off. Add a bit more oats to even things out.
- Chocolate not setting? Make sure you’re allowing them to chill in the fridge long enough. If you’re in a hurry, pop them in the freezer for a bit.
(And here’s a little secret: even if they don’t look perfect, they’ll still taste amazing. My kids gobble them up no matter what shape they’re in.)
Shopping List & Tools
Before you get started, make sure you have everything you need. I’ve been halfway through a recipe when I realized I was out of something crucial—talk about a facepalm moment. Here’s a quick list to help you avoid that:
- Natural peanut butter (check for smoothness)
- Old-fashioned oats (stock up, you’ll make these more than once)
- Honey or maple syrup (for sweetness and binding)
- Vanilla extract (because it makes everything better)
- Dark chocolate chips (for that decadent topping)
- Sea salt (just a pinch)
- Muffin tin and cupcake liners (for easy cleanup)
And let’s talk tools. You don’t need anything fancy: a medium mixing bowl, a spoon or spatula for stirring, and a microwave or stovetop for melting the chocolate. That’s it!
Variations
One of the joys of this recipe is its flexibility. Here are a few ways to mix it up:
- Swap out the peanut butter for another nut or seed butter.
- Add a layer of jam under the chocolate for a PB&J vibe.
- Mix in protein powder for an added boost—great for post-workout snacks.
- For a festive twist, sprinkle crushed candy canes on top during the holidays.
Remember, cooking is an art, and you’re the artist. Feel free to get creative!
Storage Tips
Now that you’ve made these little gems, let’s keep them fresh. You’ll want to store them in an airtight container in the fridge. They’re good for up to a week, but as I mentioned earlier, they rarely last that long in my house. If you’ve got a surplus (kudos to you for your self-control), you can freeze them for up to a month. Just make sure they’re in a single layer or separated by parchment paper so they don’t stick together.
(And if you’re sneaking one straight from the freezer, I won’t judge. They’re surprisingly good cold.)
Calorie Count
If you’re watching your intake or just curious, the calorie count in these peanut butter oat cups can vary. As I mentioned before, they’re roughly 200-250 calories each. But remember, they’re packed with wholesome ingredients, and they’re more satisfying than a lot of other treats. So, enjoy them guilt-free!
(And if you want to cut back, you can always make them smaller—mini muffin tins are perfect for bite-sized portions.)
Substitutions
If you’re dealing with dietary restrictions or missing an ingredient, here are some handy swaps:
- Out of honey or maple syrup? Try agave nectar or even brown rice syrup.
- No dark chocolate chips? Any chocolate will do, or try a drizzle of melted peanut butter on top instead.
- Gluten-free? Make sure your oats are certified gluten-free to avoid cross-contamination.
Recipes are just guidelines, so feel free to adjust to your needs and preferences. (I’ve definitely had to improvise when my pantry was less than fully stocked.)
Final Thoughts
There you have it, my dear friend in culinary adventure: Easy No Bake Peanut Butter Oat Cups that are sure to please. Whether you’re a busy parent, a student on the go, or just someone looking for a quick and delicious snack, these cups are for you. They’re proof that sometimes the simplest things in life are the most rewarding. So go ahead, whip up a batch, and take a moment to savor the sweet things in life.
(And if you end up with oatmeal on your ceiling, well, that’s just part of the fun. Happy no-baking!)